
Crochet Tulip Flower Pot: Step-by-Step Tutorial
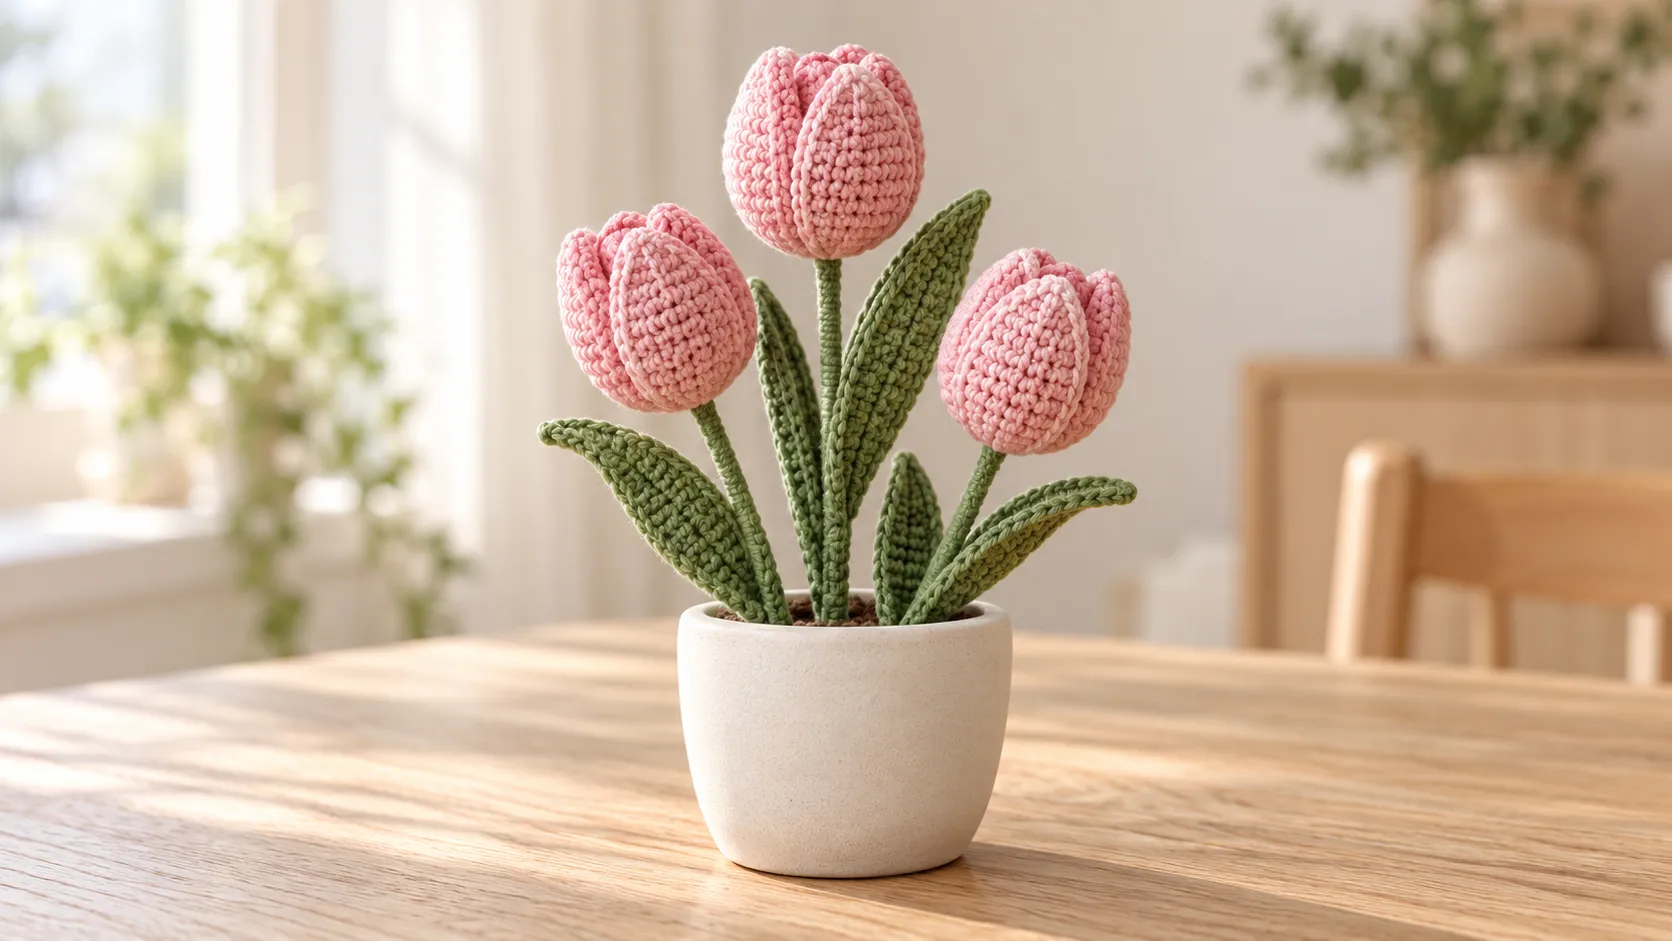
A crochet tulip flower pot brings a little handmade color to a desk, bookshelf, or bedside table. With softly rounded blooms, green leaves, and a simple ceramic container, it makes a thoughtful gift without needing a large arrangement.
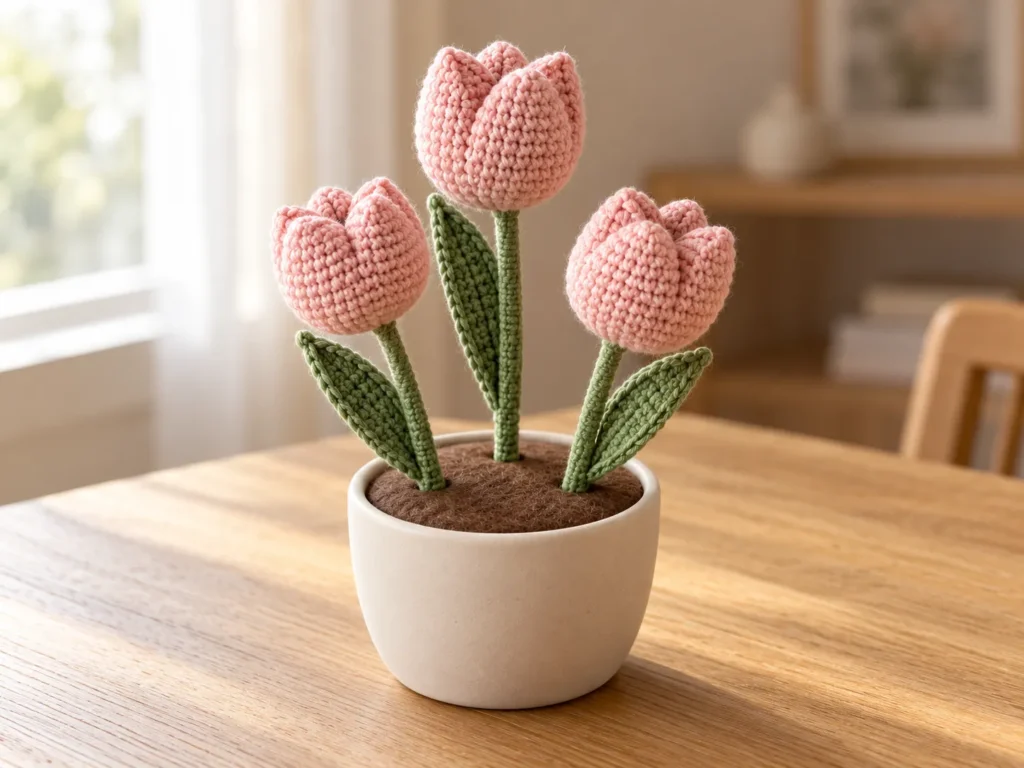
For this project, we’re using blush pink tulips, muted green foliage, and a cream-colored pot. Three flowers give the display a balanced starting point, while slightly different stem heights help each bloom stand out.
This guide covers the complete construction process: crocheting the flower heads, shaping their tops, making leaves, preparing the stems, and arranging everything in the pot. The container itself is ready-made.
Pattern status: These are proposed instructions that have not yet been physically tested. Finished dimensions, yarn quantities, and the final appearance need to be confirmed with a sample.
Table of Contents
Crochet Tulip Flower Pot: Project Overview
The arrangement consists of three stuffed flower heads, three wrapped stems, and three crocheted leaves secured inside a small pot.
| Project detail | Description |
|---|---|
| Project type | Decorative crochet flower arrangement |
| Suggested experience | Comfortable with basic stitches, working in rounds, and sewing |
| Crochet terminology | US terms |
| Flower construction | A small stuffed cup with a shaped, sewn top |
| Leaf construction | Stitches worked along both sides of a chain |
| Container | Ready-made ceramic pot |
| Finished size | Depends on yarn, tension, stem lengths, and container |
| Completion time | Not established; make one complete flower to estimate |
The stitches are straightforward, but the finishing deserves attention. Stuffing, top shaping, and stem attachment all affect how the tulips look.
Materials for Your Crochet Tulip Flower Pot
Yarn and Crochet Tools
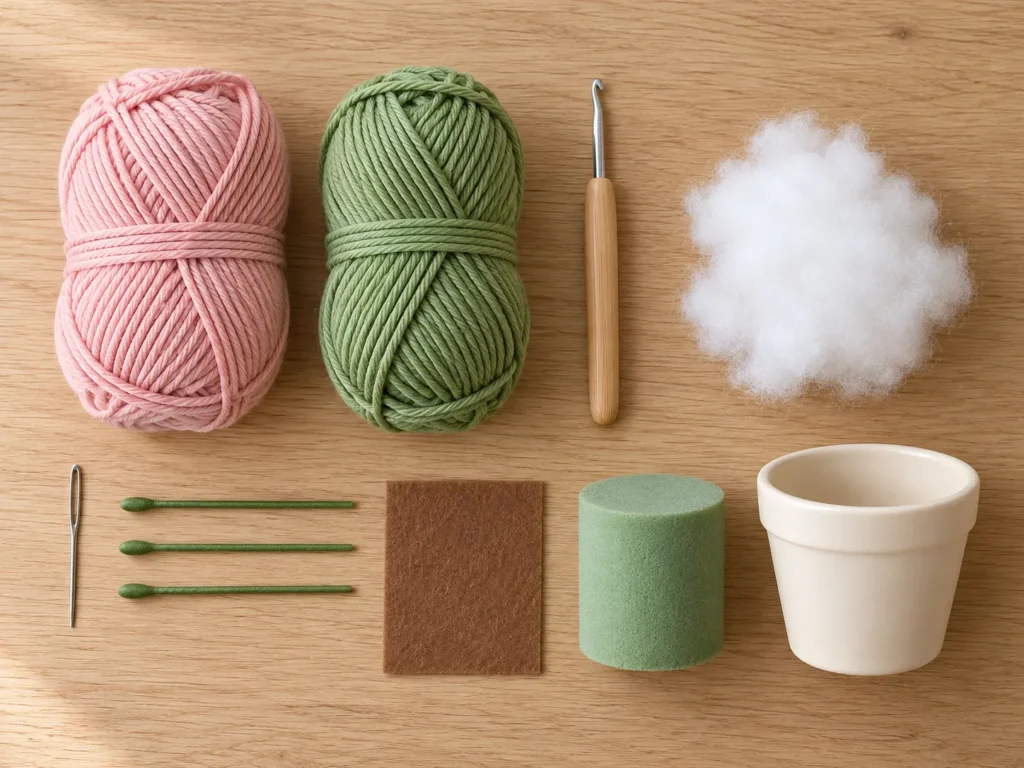
For the proposed sample, start with:
- Smooth DK-weight cotton yarn in blush pink.
- Matching-weight green cotton yarn.
- A 3 mm crochet hook as a starting point.
- A stitch marker.
- Scissors.
- A yarn needle.
- Small amounts of fiberfill.
The hook size is a suggested starting point, not a tested specification. Check the fabric as you work: the flower heads should hold stuffing without visible gaps.
Use green yarn of a similar thickness to the flower yarn so the leaves remain in proportion.
Stem and Pot Supplies
You will also need:
- Three ready-made floral stem supports with covered or rounded ends.
- A small, stable ceramic pot.
- A firm craft-foam insert that fits snugly inside the pot.
- Brown felt to cover the insert.
- Craft adhesive suitable for the materials you choose.
- Floral tape if needed to help secure the yarn wrapping.
Choose the pot after making a sample flower if possible. This lets you judge the arrangement’s proportions before committing to a container.
This project is decorative and contains internal supports. Keep sharp ends fully enclosed.
Crochet Stitches and Abbreviations
The instructions use the following terms:
| Abbreviation | Meaning |
|---|---|
| ch | Chain |
| sl st | Slip stitch |
| sc | Single crochet |
| hdc | Half double crochet |
| dc | Double crochet |
| inc | Work 2 single crochets into the same stitch |
| st | Stitch |
| MR | Magic ring |
A number in parentheses indicates the stitch count at the end of a round.
For the flower head, work in continuous rounds. Do not join or turn between rounds unless instructed. Move your stitch marker into the first stitch of each new round.
Before You Begin
Make One Complete Tulip First
Finish one flower head, one leaf, and one stem before repeating the pieces.
This sample will help you check the flower’s shape, the strength of the stem attachment, and the proportions of the leaf. It also gives you something to hold against the pot when planning the display.
Keep the Flower Fabric Firm
Stuffing should stay inside the flower rather than appearing through the stitches. If the fabric looks open, try a slightly smaller hook or adjust your tension.
Avoid pulling every stitch so tightly that working into it becomes difficult.
Leave Useful Sewing Tails
The flower’s final yarn tail is used to shape the top. The leaf tail is used for attachment.
Leaving these tails long enough makes the finishing easier and reduces the number of extra joins.
How to Make a Crochet Tulip Flower Pot
Step 1: Crochet the First Tulip Head
Using blush pink yarn:
| Round | Instructions | Stitch count |
|---|---|---|
| 1 | Work 6 sc into a magic ring. | 6 |
| 2 | Inc in every stitch. | 12 |
| 3 | Repeat (1 sc, inc) 6 times. | 18 |
| 4 | Repeat (2 sc, inc) 6 times. | 24 |
| 5–10 | Work 1 sc in every stitch for six rounds. | 24 per round |
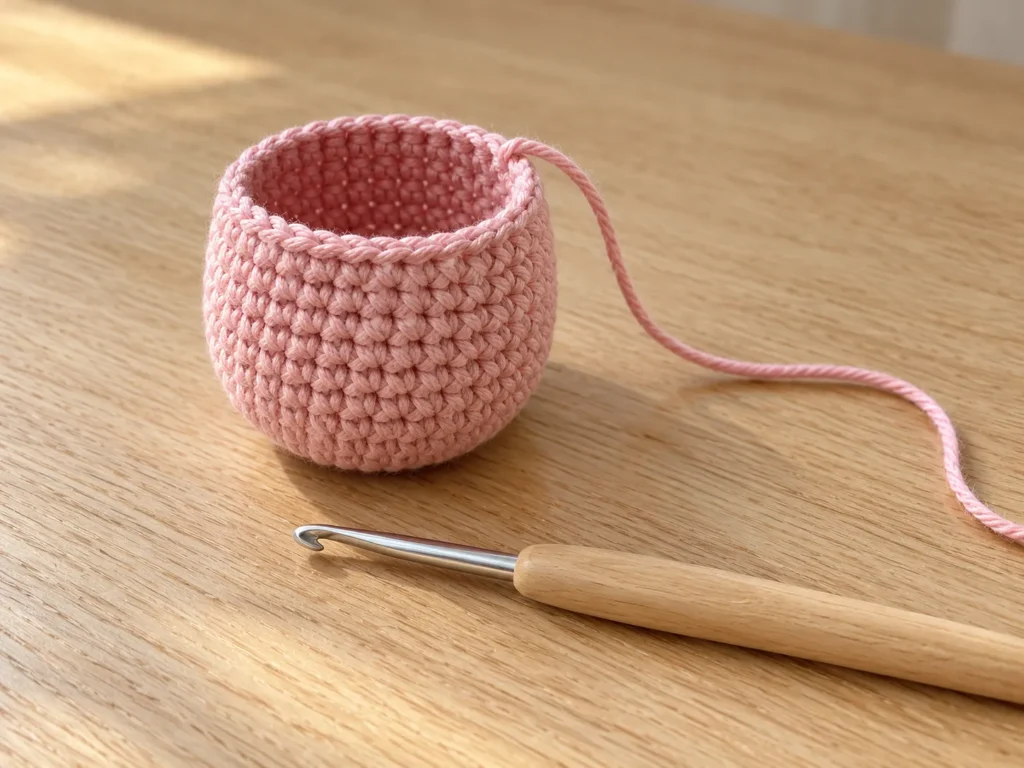
After round 10, slip stitch into the next stitch. Fasten off, leaving a sewing tail of approximately 30 cm.
You should have a small cup with a rounded base and an open top. The exact proportions will depend on your yarn and tension.
Check that the fabric is facing right side out before stuffing.
Step 2: Add the Stuffing
Place a small amount of fiberfill inside the cup.
Distribute it around the base and sides so the flower looks rounded rather than lumpy. Add more gradually until it holds its shape.
Leave some room below the opening. You need to bring sections of the upper edge together, and overstuffing will make that difficult.
The cup should feel softly filled, not stretched.
Step 3: Shape the Tulip Top
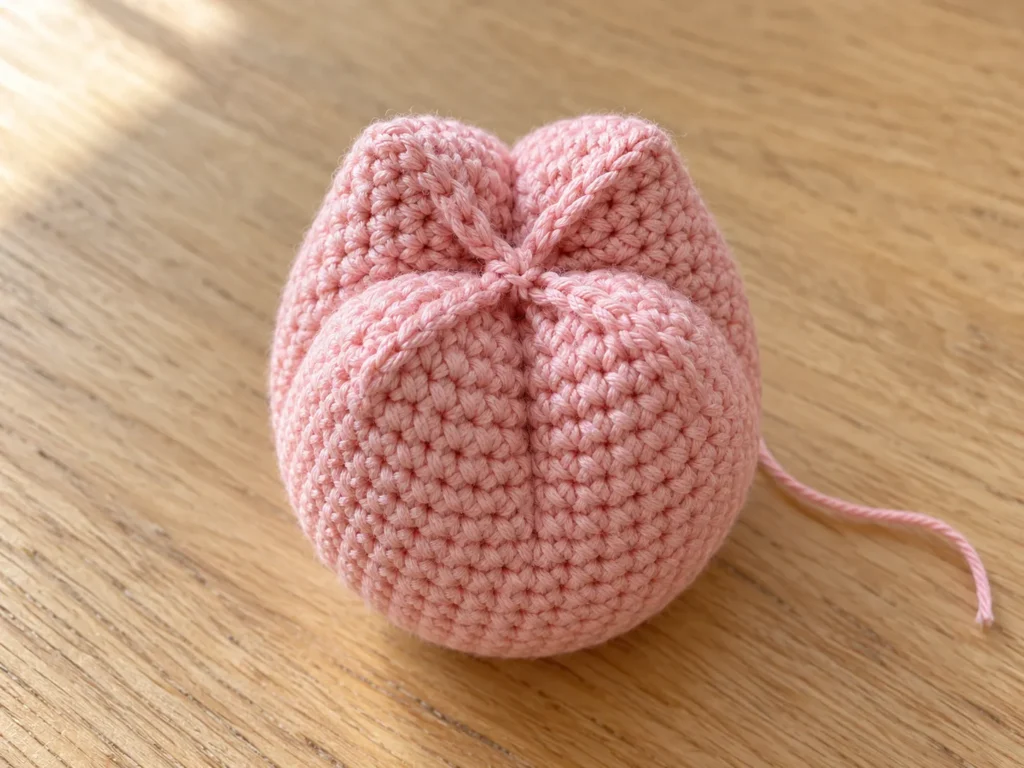
The top is formed by bringing four equally spaced points on the opening together.
- Place four removable markers around the 24-stitch rim, with six stitches between each marked point.
- Thread the long pink tail onto a yarn needle.
- Bring the first marked point and the opposite marked point together at the center.
- Sew through both points a couple of times to hold them.
- Bring the remaining two marked points into the same center.
- Secure all four points together with a few small stitches.
- Remove the markers and hide the yarn end inside the flower.
The spaces between the joined points create the rounded sections of the tulip top. Adjust the stuffing gently so those sections look balanced.
Do not sew the whole rim into a straight seam. The goal is a central join with four softly rounded sections around it.
Step 4: Make the Remaining Flower Heads
Repeat the same instructions to make two more tulips.
Compare all three before preparing the stems. Look for similar height, fullness, and top shaping.
Small handmade differences are natural, but a noticeably larger flower may need less stuffing or a tension adjustment.
For a cohesive crochet tulip flower pot, keep the same hook and yarn weight across all three heads.
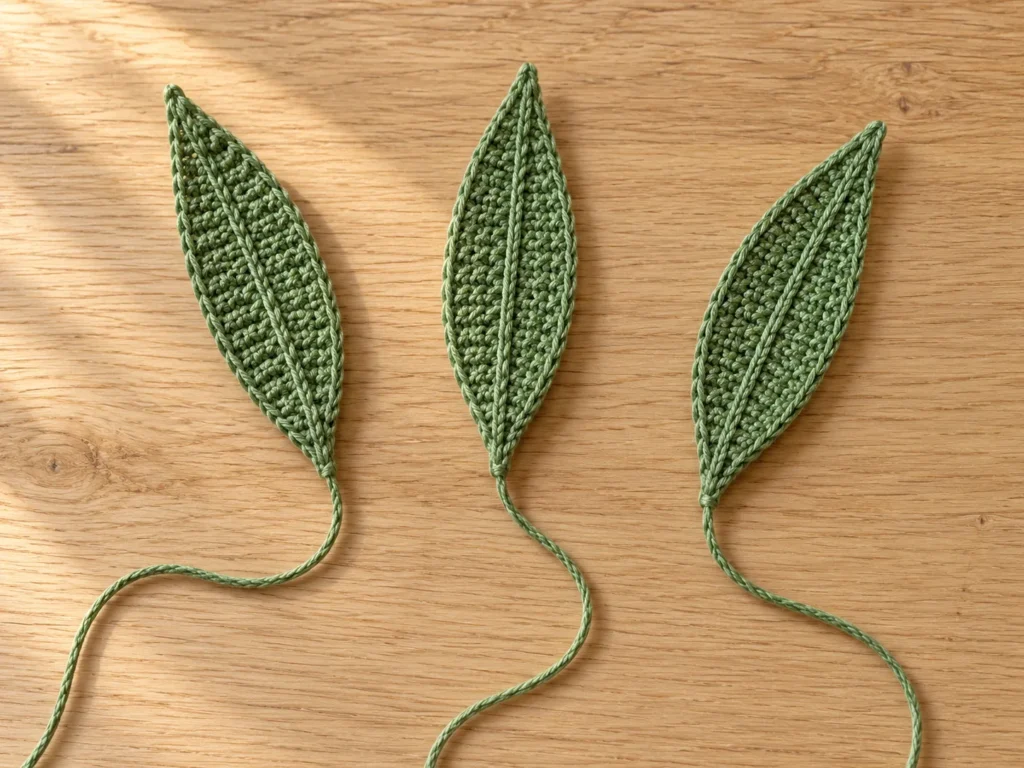
Step 5: Crochet a Green Leaf
This proposed leaf is worked along both sides of a starting chain.
Using green yarn, chain 16.
First side
Beginning in the second chain from the hook, work:
- 1 sl st.
- 1 sc.
- 1 hdc.
- 1 dc in each of the next 9 chains.
- 1 hdc.
- 1 sc.
- 1 sl st in the final chain.
This uses all 15 available chain positions.
Chain 1 to turn around the end. Do not flip the piece over as you would for a new row. Rotate it so you can work into the unused loops along the opposite side of the starting chain.
Second side
Starting in the opposite-side loop of the chain just worked into, repeat the same sequence:
- 1 sl st.
- 1 sc.
- 1 hdc.
- 1 dc in each of the next 9 chain positions.
- 1 hdc.
- 1 sc.
- 1 sl st in the final position.
Slip stitch into the first slip stitch to join. Fasten off, leaving a long attachment tail.
Gently smooth the leaf with your fingers. The taller stitches form its wider middle, while the shorter stitches taper the ends.
Make three leaves, one for each stem.
Step 6: Prepare and Wrap the Stems
Hold a flower head above the pot to decide how tall you want the display to be.
Plan three slightly different heights. Keep the variation modest so the tulips still read as one arrangement.
To wrap each support:
- Secure the end of the green yarn below the support’s upper tip.
- Wrap the yarn closely around the shaft, covering the support evenly.
- Add suitable adhesive sparingly where needed to prevent slipping.
- Continue down to the section that will enter the pot insert.
- Secure the lower yarn end and let the adhesive set according to its instructions.
Keep the wrapping smooth. Large overlaps can create bumps beneath the leaves.
Step 7: Attach the Flower Heads and Leaves
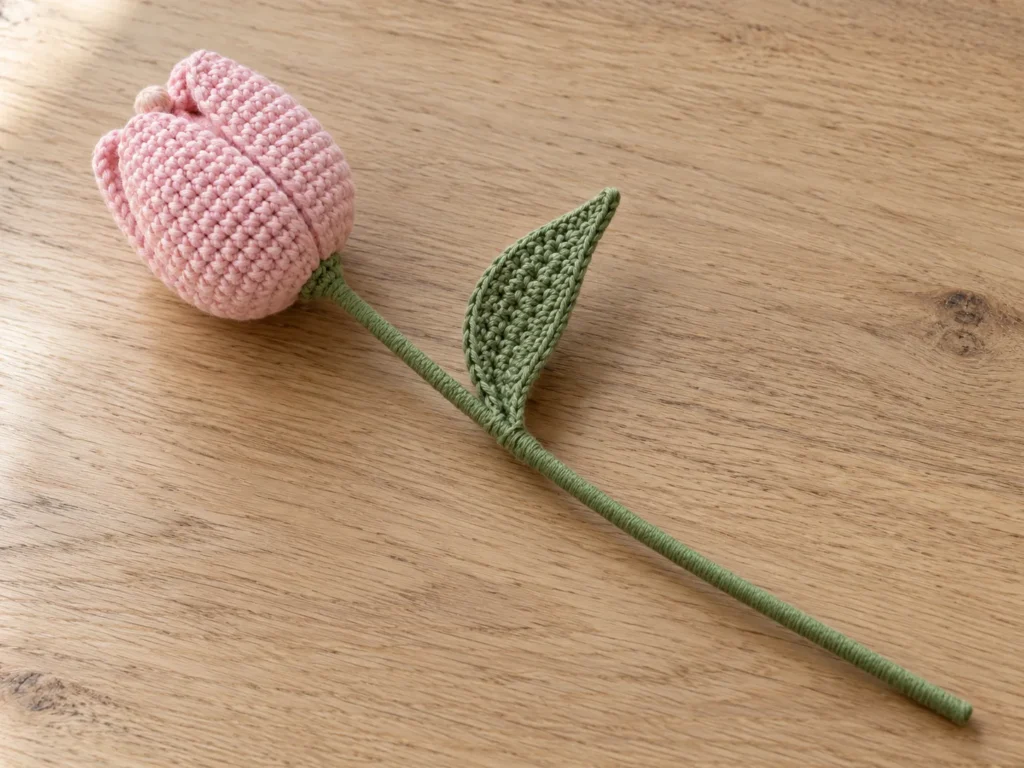
Position the upper end of a wrapped support at the center of a flower’s underside.
Ease the covered tip between stitches into the stuffing, without cutting the yarn. Stop well before the support reaches the tulip’s top.
Use green yarn to sew several anchoring stitches through the flower’s base and around the wrapped stem. Secure the connection and hide the ends.
Check that the head does not rotate or slide easily. Adhesive can supplement the join if appropriate, but allow it to set before arranging the flower.
Next, place one leaf against the stem:
- Position its lower tip below the bloom.
- Sew the lower section around the yarn-wrapped stem.
- Add a second attachment slightly higher if the leaf twists.
- Leave the upper section free to curve outward.
Repeat for the other two flowers.
Step 8: Prepare the Pot
Fit the craft-foam insert inside your container. It should sit firmly without moving from side to side.
Cut a piece of brown felt to cover its top surface. The felt acts as a simple soil effect and hides the insert.
Make three small openings in the felt where the stems will enter. Keep these openings narrow so the surface remains tidy.
Place the felt over the insert and tuck or secure the edges as needed.
The container and insert should support the finished flowers without tipping or wobbling.
Step 9: Arrange Your Crochet Tulip Flower Pot
Start with the tallest tulip toward the back. Add the other two slightly forward and to either side.
Push each stem into the insert far enough to hold it securely. Keep the flower heads separated so their shapes remain visible.
Turn the pot and check:
- Can you see all three blooms from the front?
- Do the leaves frame the flowers without hiding them?
- Are the stems secure?
- Does the arrangement feel balanced from the side?
Adjust the positions before securing anything permanently.
A crochet tulip flower pot usually needs very little extra decoration. Let the flowers and their handmade texture remain the focus.
Crochet Tulip Flower Pot: Video Overview
Watch this short overview to see the main stages of creating a crochet tulip flower pot, then follow the written instructions below.
Best Color Combinations for a Crochet Tulip Flower Pot
Blush Pink, Sage Green, and Cream
This is the palette used in the project. The soft contrast suits a bedroom, desk, or reading corner.
Lavender, Muted Green, and White
Lavender flowers introduce a cooler shade while keeping the arrangement gentle and understated.
Yellow, Natural Green, and Terracotta
Yellow blooms work well with the warmer tones of an unglazed pot.
Red, Deep Green, and Ivory
A stronger contrast makes the flower heads more prominent. Keep the container simple so the colors do not compete.
If you mix flower colors, use yarns from the same range where possible to keep the thickness and finish consistent.
Common Problems and How to Fix Them
The Flower Looks Too Round
Check the amount of stuffing and the way the top is joined. Too much fiberfill can push the sides outward and hide the tulip shape.
For the proposed pattern, the flower’s proportions still need sample testing. Adjust the number of plain rounds only after assessing a completed flower.
The Top Looks Uneven
Check that the four joining points are evenly spaced around the opening. Unequal spacing creates sections of different sizes.
Loosen the center join if necessary, redistribute the stuffing, and resew.
The Leaf Twists
Check that you worked the second side into the unused loops of the starting chain and did not accidentally skip a position.
Gentle shaping may help. If blocking is appropriate for your yarn, follow its care instructions.
The Flower Head Wobbles
Inspect the stitching at the base and the fit of the internal support. Reinforce the attachment rather than relying on the surrounding leaves to hold the head upright.
The Pot Tips Over
Reduce excessive stem height, reposition the flowers nearer the center, or choose a heavier container. Check that the insert itself is not shifting.
Care and Maintenance
Keep your crochet tulip flower pot dry and dust it gently with a soft brush.
Because the finished arrangement contains supports, an insert, and possibly adhesive, avoid soaking the complete project. Treat small marks according to the yarn manufacturer’s guidance and the requirements of the other materials.
Lift the arrangement by the pot rather than by the flower heads. When storing it, give the blooms enough room to avoid flattening their shaped tops.
Frequently Asked Questions
Can a Beginner Make a Crochet Tulip Flower Pot?
The project uses basic crochet stitches, but it also involves sewing and assembly. It is easier if you already know how to work in rounds and recognize your stitches.
Make one flower first so you can practice the shaping before completing the set.
Is the Pot Crocheted?
No. This version uses a ready-made ceramic container with a covered insert. The flowers and leaves are crocheted, and the supports are wrapped in yarn.
Can I Use Acrylic Yarn?
You can try smooth acrylic yarn of a similar weight. Make a sample first, since a change in fiber or thickness can affect the firmness and shape.
How Much Yarn Will I Need?
A reliable quantity has not yet been established for these proposed instructions.
Weigh your yarn before and after making one flower and leaf. Use that amount to estimate the rest, then allow extra green yarn for wrapping and finishing.
Can I Make More Than Three Tulips?
Yes. Repeat the flower and leaf instructions, then choose a container and insert that can support the larger arrangement.
Give each bloom enough space rather than packing the heads tightly together.
Conclusion
A crochet tulip flower pot combines a few small handmade pieces into a complete decorative project. The flower cups establish the shape, the gathered tops give them their tulip appearance, and the leaves and varied stem heights bring the arrangement together.
Start with one sample, check the shaping, and take your time with the attachments. Once you are happy with the first flower, repeat the process to build your display.
Save this crochet tulip flower pot tutorial to your Pinterest board so you can return to the project as you work. For more flower ideas, explore our article, “5 Beautiful Crochet Flowers for Bouquets, Gifts & Home Decor,” on Crochet Harbor.
Looking for Your Next Crochet Project?
If you enjoyed making these tulips, try something different with our Baby Panda Crochet Pattern. The PDF includes round-by-round instructions, a materials list, and assembly guidance to help you create a soft crochet panda.
Choose your preferred shop to get the same digital pattern:
Get the Baby Panda PDF Pattern →
Alternative Download Link →
Digital crochet pattern only—not a finished toy.
One Comment